Wednesday, August 10, 2011

In the Kitchen | Testing for a Daisy Wedding Cake

In a few short weeks my brother will be getting married.  I made my own wedding cake, and have made some fun cakes for the kid's birthdays since then so I offered to make my brother's cake as well.  They have picked daisies as their flower, so I figured a daisy cake was in order.

Being the procrastinator that I am, I've only just recently started working on the practice cake.  Piping flowers is new to me, so this has been an adventure so far.  I need to make the flowers in advance so I can put the cake together really quickly the day before the wedding.  So, I went to my Wilton cake decorating book (inherited from my mother-in-law) to get a recipe for Royal Icing.


Royal Icing
3 egg whites (at room temperature)
1 pound (about 4 cups) confectioners sugar
1/2 teaspoon cream of tartar

Combine ingredients and beat at high speed for 7 to 10 minutes.

Yield: 4 cups


Pretty simple recipe!  The catch is that this icing dries very quickly so you need to keep your bowl covered with a damp cloth.  Also, you need to use this icing right away since you cannot rebeat it.

I piped my daisies on a flower nail, gave them yellow centers, then laid them to dry on my flower molds.  These are curved to give flowers a nice curve, rather than being flat.  My daisies were dry in about a day and ready to put on a cake.

The bride (who is actually a friend of mine) does not like anything too sweet so she requested something other than a buttercream frosting for the cake.  Specifically, she wondered if a Whipped Cream frosting would work.  Since I've never made a whipped cream frosting it was back to the Wilton book.

Well...I tried their recipe but was not really happy with the results.  I'm sure part of the reason was my inexperience with this type of frosting.  But it was edible, though a little hard to work with, so I frosted my test cake anyway.

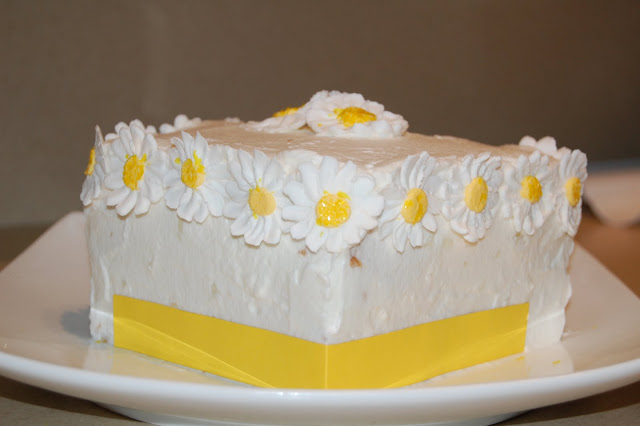
Now to decide on a look for the daisy cake.  I'm thinking of two different approaches.

1. Wrap a ribbon around the base (represented by a piece of yellow paper in my picture) of the cake that matches the ribbon used in the flowers.  Place daisies around the upper edge of the cake and a little pile of daisies on top.


Same option, close-up:


2. Begin with a pile of daisies on top of the cake, then arrange them so they cascade around and down the cake.  This one was a little tricky to show because my test cake was a little small.


What do you think is the better option?  More orderly daisies in a row with ribbon, or a casual cascading pile of daisies?

Disclaimer:  You'll have to excuse the messy frosting job, the recipe I used was very difficult to smooth.  The recipe also had gelatin in to stabilize, which turned into little chunks when added to the cream. I need to experiment a little more with the frosting.  Chunky and hard to spread and smooth just won't do :)

This post will be linked at:


In the Garden | A New Gardening Tool...


... a Chainsaw!  Strange as it may seem, this chainsaw is actually going to help my garden.  Here's how:

Our house is situated in an older neighborhood with lots of mature trees, particularly oak and maple.  While this is great for keeping cool in the summer, it is not so great for growing vegetables.  In our yard alone we had about 22 trees when we first moved in!  Now just think of all the leaves that means we have to rake every fall!

I love our mature trees, but we simply have too many trees and not enough open yard space.  Slowly we have been regaining some space and removing some trees.  We've removed a dead birch from the front yard, a smaller oak tree from the backyard, and three sassafras trees where the kids' playset now sits.  That still left 17 trees and no really good sunny place to put a garden.


My garden sits in the back of this picture and is shaded by this row of trees for much of the afternoon.  On top of that, the retaining wall that is next to the trees is falling apart and becoming a hazard.  The trees and the wall must go!

So, this past weekend my husband and I loaded up the kids and took them out to buy a chainsaw.  The very next day my husband had the chainsaw fired up and dropped the two smallest trees.  Next up, four larger trees - pictures to come.  I'm envisioning a great before and after shot.

I'll leave you with a picture of my garden that is growing in spite of all the shade it gets.  The beans are even starting to grow tiny beans and the cucumbers are climbing the trellis.  So far the tomatoes are not looking as good, so time will tell if we get any tomatoes.


Tuesday, August 2, 2011

In the Kitchen | Black Bean Quesadillas with Corn Salsa


Last week I borrowed Cooking Light Weeknight from the library and have been experimenting with recipes all week.  This particular cookbook has a picture for every recipe and all the recipes that I've looked at are under 500 calories for a meal.  I love black beans, so the picture of this recipe really drew me in and I had to try it.

Black Bean Quesadillas with Corn Salsa
Source: Cooking Light Weeknight
Quesadillas:
1 tablespoon olive oil
1 1/2 teaspoons minced garlic
2 cups chopped plum tomatoes
1/2 cup chopped fresh cilantro
1 (15 oz) can black beans, rinsed and drained
4 (8 inch) flour tortillas
Cooking spray
3/4 cup (3 oz) preshredded 4-cheese Mexican blend cheese (Instead, I used a mixture of cheddar and pepper jack.  The pepper jack added a nice spice to the quesadillas.)

Preheat broiler.  Heat olive oil in a large skillet over medium-high heat. Add garlic, saute 30 seconds. Add tomatoes, cilantro and beans; cook 5 minutes or until liquid evaporates, stirring occasionally.

Place tortillas on a baking sheet coated with cooking spray. Top each tortilla with 1/2 cup bean mixture and 3 tablespoons cheese; fold in half. Lightly coat tops with cooking spray. Broil 3 minutes or until cheese melts and tortillas begin to brown. Cut each tortilla into 3 wedges.

Salsa:
1 cup frozen whole-kernel corn
1/2 cup chopped fresh cilantro
2 tablespoons lime juice
1/2 teaspoon minced garlic
1 red bell pepper, chopped

Combine all ingredients in a small saucepan. Bring to a boil over high heat and cook 2 minutes, stirring frequently.

Yield: 4 servings
1 serving is 3 quesadilla wedges and about 1/3 cup salsa)
Calories: 420

If you chop all the veggies the night before and keep in the refrigerator, this recipe comes together very quickly.  It was really tasty and made a great leftovers for lunch the next day!

Shared at:
Nap-Time Creations

Monday, August 1, 2011

In the Garden | Trellis Structure


My husband just checked the garden tonight and the beans have blossoms!  The picture is from a couple of days ago, showing the mass of bean plants.  Hopefully we'll be eating fresh beans from the garden soon.

At the back of my garden you'll notice an addition, the trellis structure that my husband put up for me.  Here's a closer look:


It was actually really simple, two metal fence posts that he drove into the ground.  Then he took some mesh wire that we had on hand and stretched it across and around the fence posts.  In case you're wondering, the big black box behind the garden is our compost bin.

The cucumbers have already begun to climb the trellis, I helped guide them through the holes and already they are wrapping little tendrils around the wire.


I'm not sure how the tomatoes will work yet, time will tell with them.  I carefully pushed the largest vines through the holes to get the plants up and off my onions.  I did harvest a little from my garden already - a few onions!  When I was checking to see how they were doing, I just couldn't resist plucking a few out.  I chopped them up and we ate them as a garnish on our Tamale Casserole last week.


Though its still early, I think the trellis will be a success.  It seems much sturdier than tomato cages and will hopefully last for many years.

LinkWithin

Related Posts Plugin for WordPress, Blogger...