Wednesday, August 10, 2011

In the Kitchen | Testing for a Daisy Wedding Cake

In a few short weeks my brother will be getting married.  I made my own wedding cake, and have made some fun cakes for the kid's birthdays since then so I offered to make my brother's cake as well.  They have picked daisies as their flower, so I figured a daisy cake was in order.

Being the procrastinator that I am, I've only just recently started working on the practice cake.  Piping flowers is new to me, so this has been an adventure so far.  I need to make the flowers in advance so I can put the cake together really quickly the day before the wedding.  So, I went to my Wilton cake decorating book (inherited from my mother-in-law) to get a recipe for Royal Icing.


Royal Icing
3 egg whites (at room temperature)
1 pound (about 4 cups) confectioners sugar
1/2 teaspoon cream of tartar

Combine ingredients and beat at high speed for 7 to 10 minutes.

Yield: 4 cups


Pretty simple recipe!  The catch is that this icing dries very quickly so you need to keep your bowl covered with a damp cloth.  Also, you need to use this icing right away since you cannot rebeat it.

I piped my daisies on a flower nail, gave them yellow centers, then laid them to dry on my flower molds.  These are curved to give flowers a nice curve, rather than being flat.  My daisies were dry in about a day and ready to put on a cake.

The bride (who is actually a friend of mine) does not like anything too sweet so she requested something other than a buttercream frosting for the cake.  Specifically, she wondered if a Whipped Cream frosting would work.  Since I've never made a whipped cream frosting it was back to the Wilton book.

Well...I tried their recipe but was not really happy with the results.  I'm sure part of the reason was my inexperience with this type of frosting.  But it was edible, though a little hard to work with, so I frosted my test cake anyway.

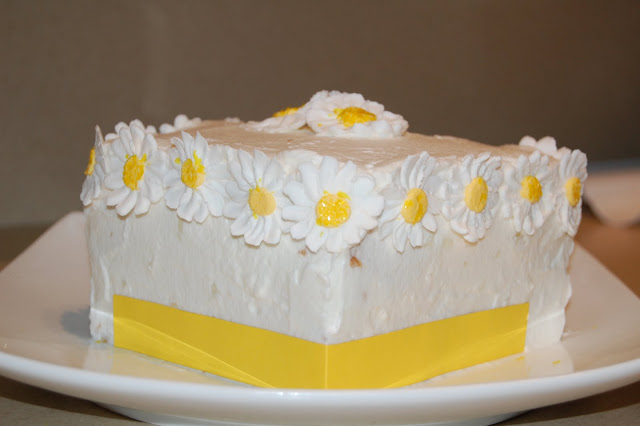
Now to decide on a look for the daisy cake.  I'm thinking of two different approaches.

1. Wrap a ribbon around the base (represented by a piece of yellow paper in my picture) of the cake that matches the ribbon used in the flowers.  Place daisies around the upper edge of the cake and a little pile of daisies on top.


Same option, close-up:


2. Begin with a pile of daisies on top of the cake, then arrange them so they cascade around and down the cake.  This one was a little tricky to show because my test cake was a little small.


What do you think is the better option?  More orderly daisies in a row with ribbon, or a casual cascading pile of daisies?

Disclaimer:  You'll have to excuse the messy frosting job, the recipe I used was very difficult to smooth.  The recipe also had gelatin in to stabilize, which turned into little chunks when added to the cream. I need to experiment a little more with the frosting.  Chunky and hard to spread and smooth just won't do :)

This post will be linked at:


In the Garden | A New Gardening Tool...


... a Chainsaw!  Strange as it may seem, this chainsaw is actually going to help my garden.  Here's how:

Our house is situated in an older neighborhood with lots of mature trees, particularly oak and maple.  While this is great for keeping cool in the summer, it is not so great for growing vegetables.  In our yard alone we had about 22 trees when we first moved in!  Now just think of all the leaves that means we have to rake every fall!

I love our mature trees, but we simply have too many trees and not enough open yard space.  Slowly we have been regaining some space and removing some trees.  We've removed a dead birch from the front yard, a smaller oak tree from the backyard, and three sassafras trees where the kids' playset now sits.  That still left 17 trees and no really good sunny place to put a garden.


My garden sits in the back of this picture and is shaded by this row of trees for much of the afternoon.  On top of that, the retaining wall that is next to the trees is falling apart and becoming a hazard.  The trees and the wall must go!

So, this past weekend my husband and I loaded up the kids and took them out to buy a chainsaw.  The very next day my husband had the chainsaw fired up and dropped the two smallest trees.  Next up, four larger trees - pictures to come.  I'm envisioning a great before and after shot.

I'll leave you with a picture of my garden that is growing in spite of all the shade it gets.  The beans are even starting to grow tiny beans and the cucumbers are climbing the trellis.  So far the tomatoes are not looking as good, so time will tell if we get any tomatoes.


Tuesday, August 2, 2011

In the Kitchen | Black Bean Quesadillas with Corn Salsa


Last week I borrowed Cooking Light Weeknight from the library and have been experimenting with recipes all week.  This particular cookbook has a picture for every recipe and all the recipes that I've looked at are under 500 calories for a meal.  I love black beans, so the picture of this recipe really drew me in and I had to try it.

Black Bean Quesadillas with Corn Salsa
Source: Cooking Light Weeknight
Quesadillas:
1 tablespoon olive oil
1 1/2 teaspoons minced garlic
2 cups chopped plum tomatoes
1/2 cup chopped fresh cilantro
1 (15 oz) can black beans, rinsed and drained
4 (8 inch) flour tortillas
Cooking spray
3/4 cup (3 oz) preshredded 4-cheese Mexican blend cheese (Instead, I used a mixture of cheddar and pepper jack.  The pepper jack added a nice spice to the quesadillas.)

Preheat broiler.  Heat olive oil in a large skillet over medium-high heat. Add garlic, saute 30 seconds. Add tomatoes, cilantro and beans; cook 5 minutes or until liquid evaporates, stirring occasionally.

Place tortillas on a baking sheet coated with cooking spray. Top each tortilla with 1/2 cup bean mixture and 3 tablespoons cheese; fold in half. Lightly coat tops with cooking spray. Broil 3 minutes or until cheese melts and tortillas begin to brown. Cut each tortilla into 3 wedges.

Salsa:
1 cup frozen whole-kernel corn
1/2 cup chopped fresh cilantro
2 tablespoons lime juice
1/2 teaspoon minced garlic
1 red bell pepper, chopped

Combine all ingredients in a small saucepan. Bring to a boil over high heat and cook 2 minutes, stirring frequently.

Yield: 4 servings
1 serving is 3 quesadilla wedges and about 1/3 cup salsa)
Calories: 420

If you chop all the veggies the night before and keep in the refrigerator, this recipe comes together very quickly.  It was really tasty and made a great leftovers for lunch the next day!

Shared at:
Nap-Time Creations

Monday, August 1, 2011

In the Garden | Trellis Structure


My husband just checked the garden tonight and the beans have blossoms!  The picture is from a couple of days ago, showing the mass of bean plants.  Hopefully we'll be eating fresh beans from the garden soon.

At the back of my garden you'll notice an addition, the trellis structure that my husband put up for me.  Here's a closer look:


It was actually really simple, two metal fence posts that he drove into the ground.  Then he took some mesh wire that we had on hand and stretched it across and around the fence posts.  In case you're wondering, the big black box behind the garden is our compost bin.

The cucumbers have already begun to climb the trellis, I helped guide them through the holes and already they are wrapping little tendrils around the wire.


I'm not sure how the tomatoes will work yet, time will tell with them.  I carefully pushed the largest vines through the holes to get the plants up and off my onions.  I did harvest a little from my garden already - a few onions!  When I was checking to see how they were doing, I just couldn't resist plucking a few out.  I chopped them up and we ate them as a garnish on our Tamale Casserole last week.


Though its still early, I think the trellis will be a success.  It seems much sturdier than tomato cages and will hopefully last for many years.

Thursday, July 28, 2011

In the Garden | Deck Planters

This week my ever helpful husband put up a trellis for my cucumber and tomato plants that I wanted to share with you. Unfortunately it was pouring when I wanted to take pictures, so that will have to wait. On the positive side, my garden is getting a much needed drink after a lot of sweltering hot weather.


Instead I thought I would share another area of my garden - on my deck. Last summer my father and husband built a railing for the deck to keep our little ones safe. After the job was finished, my husband built some planters for me also.  Since the deck is right off the kitchen I thought that planters would be the perfect way to have fresh herbs close by.  I have three planters in total and the one above is completely decorative. This particular planter is mostly shaded by the house so it is not a good choice for growing herbs.  The Fuschia that I planted there is doing great!  I'm really happy with how the plant cascades over the edges.


The remaining planters house a combination of decorative and edible plants.  The next one has basil and rosemary.  I have a pesto on the menu this week to use some of that great basil.


The final planter has chives and parsley.  The plants on either end are Wedding Veil (little white flowers) and some blue thing that has gotten rather straggly (I don't remember the name of it).


The last edible plant on my deck is in a large plastic planter to keep it contained and out of the rest of my garden - mint!  I LOVE mint jelly, but to buy mint at the grocery store is really expensive.  And the mint that you can buy is usually not very fresh.  Another thing great to make with fresh mint are Moijtos!  I'll have to post the recipe the next time we make those.


As you can see the mint seems to like its home where it gets lots of late afternoon sun.  It started out as two small little pots of mint, now its practically a bush!

There you have a peek into what is growing on my deck.  Later this week when its sunny out I'll get some pictures of my new trellis in my square foot garden and show how my garden is growing.

Wednesday, July 27, 2011

In the Kitchen | Blueberry Pops

Here in Michigan we're in the first weeks of blueberry season so last Friday we loaded up the kids and headed off to pick some blueberries.  With rain threatening and two squirrelly toddlers, we did not stay too long - just long enough to pick about eight pounds.  Some we ate fresh, some went into the freezer, some went into muffins, and some went into blueberry pops.  I've had this recipe sitting in my "to try" pile for ages and finally decided to give it a go.


Blueberry Pops
5 cups blueberries
1/2 cup water
1/2 cup sugar
1 tablespoon lemon juice

In a blender, puree all ingredients.  Place a fine-mesh sieve into a bowl and pour the contents of the blender into the strainer.


Using a rubber spatula, press the mixture through the sieve.  You want to get as much liquid into the bowl as possible, while leaving the pulp behind.

When you have mostly just pulp left in the sieve, discard the pulp.

If necessary, add additional water to yield 3 cups of liquid (I did not have to do this).


For easier pouring, I transferred the liquid into my pyrex mixer.  Carefully pour mixture into popsicle molds, place caps (or sticks) and freeze for about 3 hours or until popsicles are solid.

You can also use cups and wooden popsicle sticks if you do not have popsicle molds.

Note: This recipe yields approximately ten 2 1/2 ounce servings.  If your popsicle molds are larger than this, you will get fewer popsicles.


To remove popsicles, run them under warm water until they loosen.

Enjoy!

Yield: 10 servings
Per serving: 58 calories


Another alternative is to freeze some of the mixture until it is somewhat slushy, but not solid.  Insert and straw and you have a smoothie!  Since I only had one clean set of molds available when I made these, I made slushies for the kids for dessert - they highly approved!

Friday, July 22, 2011

Friday Fun | Watercolor Painting

One of the things I enjoy most about being a mom are the fun little activities that you can do with little ones.  And the great thing with preschoolers is, everything is new and exciting.  In this case, watercolors.

It's only mid July, but already I've seen back to school sales around here.  I love seeing all the new markers, paper, pencils, backpacks, and so on.  At my local grocery store this week they had Crayola watercolors on sale for $1.00.  I've been keeping an eye open for some since Crayola seems to have the best.  I've tried off brands before but have always been disappointed with the quality.  So on my regular shopping trip I picked up two sets.


Jaden was so excited to try painting.  I sat down with him and showed how to get them wet, then showed how to drag the brush across the paper.  What fun watching him in deep concentration as he created his masterpiece!


He even managed to stay reasonably clean - though he did try to lick the paintbrush a couple of times, eww!  Jaden just couldn't wait to show Daddy how he could paint and his pictures are now hanging on the fridge for all to enjoy.

Have a fun Friday!


Thursday, July 21, 2011

Tutorial | Child Sized Oven Mitts

My kids both love to play with the pretend food that they got for Christmas last year.  So to go along with their food I decided to make them a pair of oven mitts.  I could not find a good pattern online anywhere so I decided to make my own.  After a few failed attempts (sorry no pictures of those), I came up with one that works for all ages.  I would rate this project as easy, it took me about 3 hours to complete the two mittens.  Keep reading if you want to make a pair of your own!

Warning:  These oven mitts are for play only.  They are NOT oven safe.


Materials Needed:
Free child sized oven mitt pattern
2 fat quarters (one in a print, one in a solid)
4 pieces of quilt batting (each about 8" by 11")
2 pieces of double fold bias tape (each about 11 1/2" inches long)

For the bias tape I chose the same color as the solid fat quarter.


Begin with the solid fat quarter.  Fold in half and lay the pattern on top.  Pin your pattern down and cut out.  Repeat.  You need a total of 4 mitts from the solid fabric.

You should be able to get 4 pieces from one fat quarter.


Repeat with the print fat quarter.  Fold in half, position and pin your pattern and cut out 4 mitts.

You should now have 4 solid mitt pieces and 4 print mitt pieces.


Lay one of the solid pieces on the table WRONG side up.  Take one piece of quilt batting and lay over the top so the solid fabric is completely covered.  Lay a print piece over the top RIGHT side up.  Adjust so the print and solid pieces match up perfectly.  Pin the 3 layers in place.


Repeat with the other solid and print pieces.  The picture show 2 pieces ready for sewing, in total you should have 4.


Now comes the slightly time consuming part.  Using your sewing machine, quilt the three layers together as follows.

Lay the first piece at a diagonal to the foot.  Sew straight across (at a diagonal) until you reach the other side.  This line of stitching will be your guide for the rest of the quilting.


Using the foot as a guide for width, sew parallel diagonal lines across the entire piece until it looks like the picture.


Next, turn the piece so your sewing machine foot is perpendicular to your diagonal lines.  You are going to repeat the process above, but in the opposite direction to create a grid of little squares over the entire surface of the piece.

Repeat this process until all your pieces are quilted.


Trim the excess quilt batting and any loose threads.


Take 2 pieces and align them with the print sides facing each other.  Pin around the edge.

Repeat with the other 2 pieces.


Sew the pieces together with a 1/4" seam allowance.

Serge or zig-zag stitch the edge so they won't fray. I do not have a serger so I use a zig-zag stitch - it is quite sufficient for this project.

Repeat with the other mitt.


Turn both mitts right side out.

If you haven't already, cut 2 pieces of bias tape, each 11 1/2 inches long.


Take one piece of bias tape and unfold each end.  Pin the ends, right sides facing and sew with a 1/4" seam allowance.

Repeat with other piece of bias tape.


Turn and refold the bias tape so it forms a ring.


Sandwich the raw edge of the mitten in the center of the bias tape and pin in place.  Sew around the edge about an 1/8" in from the open edge of the bias tape.


Repeat with other mitt and voila!  Two oven mitts that any child is sure to love.

I can get my hands inside the oven mitts so they should be big enough for any child.  My two-year-old has no troubles getting them on either.

Enjoy!  I'd love to see your projects - feel free to comment and leave a link to your own project.

Wednesday, July 20, 2011

In the Kitchen | Chocolate Haystacks (No-Bake Cookies)

It is hot, hot this week so I really do not like to use the oven to bake cookies.  This recipe is from my childhood and is great for weeks like these.

Chocolate Haystacks

2 cups white sugar
6 tablespoons cocoa
1/2 cup butter or margarine
1/2 cup milk
1/2 tsp vanilla
2 cups shredded coconut
2 cups quick oats


Combine the sugar, cocoa, butter and milk in a saucepan over medium heat.  Bring to a boil stirring frequently.  The key to these cookies is to really let this mixture come to a full boil.

Remove from heat and stir in the vanilla, coconut and oats.

Lay waxed paper on your counter or on cookie sheets.  Drop cookie mixture by teaspoonful onto waxed paper.  Allow to cool.  As the cookies cool they will harden.  Remove cookies from wax paper and store in an airtight container.

Enjoy!


Tuesday, July 19, 2011

Cherry Picking

Around here we're in the middle of cherry season.  Our family did not make it out to cherry picking last year, but we had to go this year since our frozen cherry stash was completely gone.  I love having sour cherries in the freezer for making pies and cherry cheesecake. Yum!

We've never taken the kids cherry picking so it was a new experience for them.  They both got the hang of it really quickly.  We gave them each a pail and picked a smaller tree so they could reach.  Jaden and Hannah both started picking right away.


I was really impressed with how many cherries Jaden picked.  Of course, I should mention that we started with picking the sour cherries which are not very good for eating.  Jaden tried one and said, "I don't like it."

Look at that face!  "I don't like it Mommy!"
My cherry picker, hard at work.

He proceeded to spit it out, picked another and then asked, "Is this a good one?"  I think he thought maybe he picked a bad one.  After several similar attempts, I had to tell Jaden to stop eating them.  I assured him that we would find some good ones to eat later.  The sweet cherries were a whole different story.  Jaden was a terrible sweet cherry picker - he was too busy eating them!


By the time we were finished getting our sweet cherries, Jaden was sticky from head to toe.  His shirt was a mess and he had cherry juice dripping from his elbows.  But they sure were good!

Hannah was quite intrigued with cherry picking also, but wasn't so keen on eating them.  Instead she just studied them, put them in her bucket, then one by one dumped them out again.  She had fun though.


LinkWithin

Related Posts Plugin for WordPress, Blogger...